
Learn how to edit images for use in online environments.
Prepare an image on an iPad
- Save the image in your Photos app.
- If you want to edit in in any way. e.g. crop it, do this first in the Photos app.
- Open the Resize app.

- Click + to import the image from the Photos app.
- Enter the Width and Height that you want.
- Make sure Constrain Proportions is turned on.
- To save your image tap the Export icon and select Save Image. It will save back to your Photos app.
- Now import or copy it into your presentation.
- See examples if images sizes.
Prepare an image on a computer
This tutorial uses Photoshop Elements 6 to prepare an image for upload to the web.
Other versions of Photoshop will work in a similar way.
Copy image into PhotoShop.
(File Menu > New > Blank File. OK. Paste the image)
To resize without altering the appearance of the image:
- Image menu > Resize > Image Size.
- Select a new width or height (one only – as the other will reduce in proportion)
To resize and alter the image by cropping:
- Select the Crop tool from the Tool Bar (left of screen). Select desired part of image. Click green tick (showing on the image somewhere) to reduce size.
- An exact size can be set for this tool in Width and Height boxes in the PhotoShop menu at the top of the screen. Always set the Resolution size to 72 pixels/inch.
Save the image for web
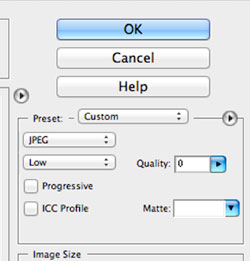
- File Menu > Save for Web.
- In Custom drop box select JPEG High.
- Click OK.
- Name image.
- Save to location on computer.
- From here you can upload to your website or use in an online presentation.